This is not quite my normal tech post, but I thought this might help other folks needing to change the O2 sensor in this particular model. There's some conflicting and incomplete information out on the web for this relatively simple task, so hopefully this will clarify things a bit.
1 Diagnosis
The check engine light came on in my wife's car, and I finally got a
chance to buy an OBD-II sensor. I ended up going with the BAFX ELM 327
Bluetooth OBD2 scan tool
When I got this hooked up (the OBD-II port is under the dash on the driver's side, coming out from the right side above the accelerator pedal), the code reported using Torque was:
P0135 "O2 sensor heater circuit bank 1 sensor 1"
A quick internet search yielded the information that this was the upstream sensor. 1
2 Parts required
With the problem identified, I just had to replace the O2 sensor.
Replacement Sensor: The OEM part for this is manufactured by Denso. You can find a replacement (at the time of writing) at Amazon.com for less the $100, the cheapest I could find online 2:
Note that this part does not work in the EX model, which requires the 234-9017:
Be careful with box stores like Autozone that give you the wrong part numbers for this car.
Oxygen sensor socket:This is a special socket with a slot down the side that lets you slide the O2 sensor wire through it. I ended up getting this one from amazon for $25 that fits the 7/8" sensor.
Ratcheting socket wrench 3/8": To fit the above socket; had this lying around in my toolbox.
Penetrating oil:Essential to have some kind of penetrating oil to loosen up the old sensor. I cheaped out and just used some WD-40 I had lying around, but you could use something like this:
Gloves and protective eyewear:Never hurts to be safe.
3 Replacement
Apply some penetrating oil to the sensor
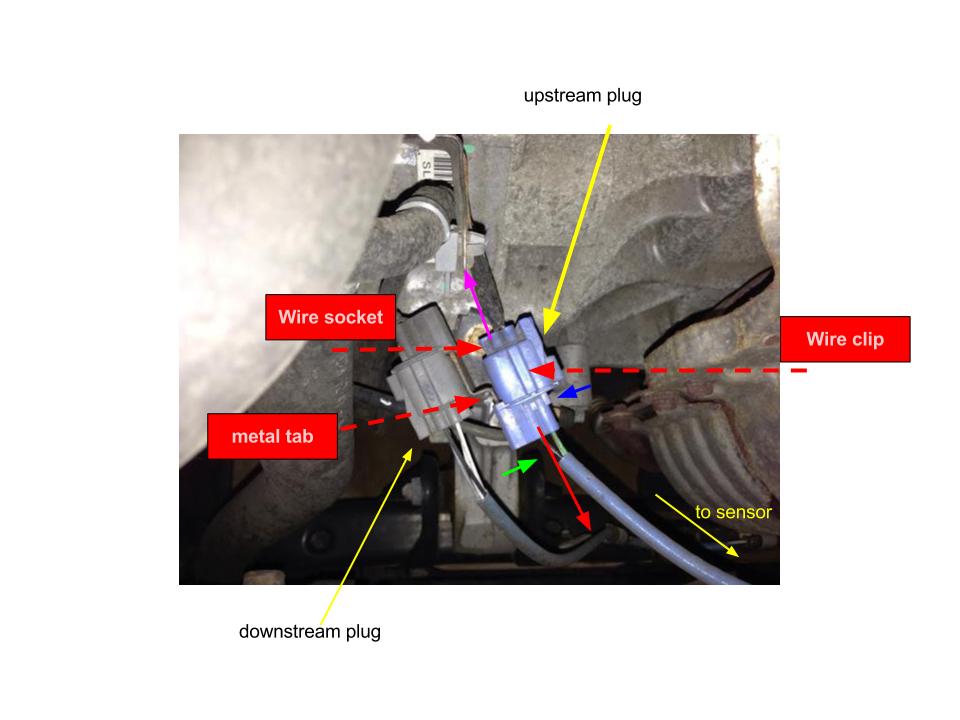
Examine the wiring harness while you wait for the sensor to loosen up. The wire from the sensor clips into a socket, and both are attached via a metal tab to the frame.
Disconnecting the old sensor wiring harness was the most difficult part of this whole task, given that I'd never done this before, and also the least documented piece.

The first step is to pry the wire clip and socket off this metal clip. Push the little tab shown in the picture up towards the wire clip (you may hear a slight click) [green arrow], and then start wiggling the clip off the metal tab [red arrow]. Go slow; the metal will usually have oxidized, and you don't want to yank too hard in case it comes loose quickly and you end up stressing the wiring coming from the ECU.
Once the wire clip and socket are free from the metal tab, you need to remove the clip from the socket. Push down on the far end of the top of the socket [blue arrow], and pull the clip out slowly [purple arrow]. This part should come out fairly easily; if it doesn't, that means you're not pushing the tab on the socket correctly to release the clip properly.
Now, you're free to use the socket to remove the old O2 sensor. Turn counter-clockwise to loosen, and then use your hands to rotate the remainder and pull out the sensor, being careful not to damage the threads.
Put anti-seize grease (included with your sensor) on the threads of the new O2 sensor, then thread it in by hand, finally tightening using the socket (Not super tight like a tire lugnut, but fairly tight)
Connect the new wiring clip to the socket, and slide the whole wiring harness back on to the metal clip (you should hear a slight click). Make sure the wire doesn't touch the engine block after attaching.
You're done! Clear out the error code using the OBD II tool, and start your engine and drive away with the satisfaction of having learned a little bit about your car and saved a few hundred dollars.3
- The Civic '05 has two sensors, the upstream (located on the engine block), and the downstream (after the catalytic converter, and accessed from underneath the car). This post only refers to the upstream one. This is actually a wide-band fuel/air ratio sensor, so it's somewhat pricey to replace compared to a regular narrow-band O2 sensor. ↩︎
- `Rock Auto`_ is also a good source ↩︎
- You may have some slight burning smell for a little while as the WD-40 and/or the anti-seize grease excess burns off ↩︎
 Denso 234-9005 Oxygen Sensor for the Civic LX
 Denso 234-9017 Oxygen Sensor for the Civic EX
 Socket
 Wrench
 Liquid Wrench
 CLC gloves
 Eyewear